


Make Your Own Bacon - How to Cure and Smoke Bacon at Home
For all the smoking of beef, pork and others that I do, I thought it was time this past week to tackle the one thing I haven’t done – make my own bacon. If you’ve been following us on Instagram you’ll have seen some of the progress of the last week, and given how successful it was, I thought I’d share the process so you can make your own bacon. There are two things you should know before you start. Firstly, it’s a process that takes about a week, depending on your patience. Secondly, the flavour is amazing, but much stronger than anything you will buy at a supermarket, so think about how much smoke flavour you like. The ingredients themselves are pretty simple:
- 1 kg – 1.5kg of Pork belly, skinless
- Moonshine BBQ Bacon Cure
If you don’t have our cure, you can make up a basic one using this:
- 3 TBS kosher salt (if you can’t find kosher, use 48g salt by weight)
- 5 TBS brown sugar
- 2 TBS pepper
- 1 tsp Prague Powder #1 (pink curing salt)
Some points on the ingredients:
- Make sure the pork belly is skinless, as you want the cure to penetrate the meat, and the skin will stop that from happening. Ask your butcher to take the skin off for you. I made the mistake with my first one of doing it myself and made a mess of it. That said, it still made awesome crackling. But I digress – make sure you still get the skin from your butcher…
- What on earth is Prague Powder #1? Well, it’s a special curing salt (sometimes called Pink Curing Salt), comprised of sodium chloride and sodium nitrite. You don’t need much of it in the mix, but it’s an essential part of the cure.
Make Your Own Bacon
Once you have all of these ingredients, the first part of the process is pretty simple.
- Mix all of the cure ingredients together in a bowl
- Lay the pork belly on a tray (to catch all the cure), pat it dry with some paper towel and sprinkle half the mix over it and rub it in, making sure it’s all covered. Flip the belly over and repeat on the other side.
- Once you’ve given it a good coating, get a large ziplock bag, put the meat in and any excess cure, zip-seal it, and pop it in the fridge.
One Good Turn Deserves Another 7
Now comes the part that requires patience. For the next 5-7 days, you’re going to flip the belly once each day. You’ll notice that there is a lot of liquid forming in the bag, this is the cure working to draw it out.
Make sure each day you turn it that you massage the bag to work the liquid and cure in. At the end of day 7 (preferably, but if you’re impatient, 5 will do), take the meat out of the bag and rinse it off. You want to get the excess cure off the skin and rinse as much off as you can.
Pat it dry with some paper towel and pop it on a rack in the fridge (put something under it to catch drips), uncovered, overnight. You want to use the cold airflow in the fridge to dry out the belly even more.
Let’s Get Smoking
The day has arrived.
Get the belly out of the fridge and bring it up to room temperature. While it’s doing that, fire up your smoker. I’ve read many temperatures to get it to, but anywhere between 175F – 200F will be OK. I use hickory wood.
Pop the meat on the rack, or if you have a smoker with hooks, by all means, hang the piece of belly. I also add hot water to the water pan in my smoker. Smoke it for 3 hours, until it has an internal temp of 150F (use a thermometer with a probe, go in through the side until it meets the middle of the meat).
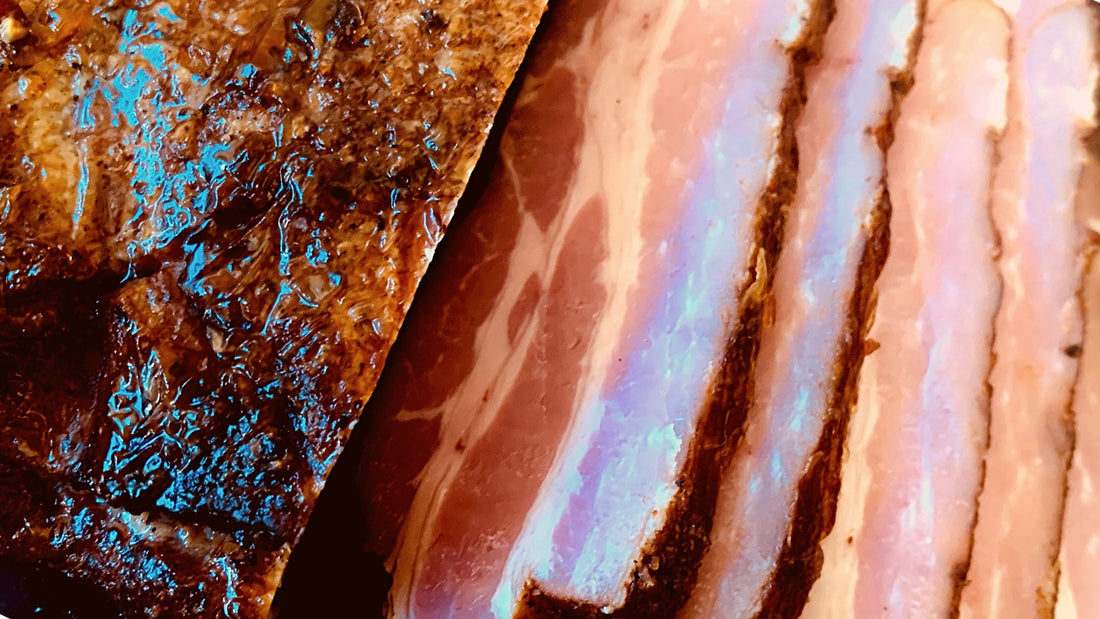
Depending on how hot you’re running your smoker, it may take more than 3 hours. The meat should also get to a beautiful mahogany colour. Once it’s at temp, take it off the smoker and let it cool to room temp. Then wrap it, or pop in an airtight container, and back in the fridge overnight. This will help it firm up just that little bit more.
Let’s Eat
When you’re ready to eat it, slice the cooked ends of the meat off (with the grain), and then slice bacon in long strips. It’s a thing of beauty when you cut through it and see all that beautiful cured pork.
Cook and serve however you like yours. Note that because of the low water content in it, it will crisp up much quicker than anything you buy from the shop. Enjoy. I’ll also post up some variants of the recipe to create different flavours as I experiment. Oh, and the best bit? Cut those slices as thick as you like…
MAPLE VARIANT
If you like maple bacon, use only 1 TBS of brown sugar and 2 TBS of maple syrup in your cure. Cover the bacon in the dry cure first, let rest, then rub maple syrup into it. You want to make sure you don’t lose any of the dry cure when you apply the liquid. The meat will come up to temp a little quicker and will be a darker mahogany colour. And it will be delicious.